Using Azure Function with .net5.0 isolated worker, make it log to an SEQ server and deploy to Azure
Uff… That´s a lot! So let´s start this travel step by step!
The use case that brought me to writing this text is:
- I have a Service Bus configured in Azure, that has a Topic, and that topic ships messages to various subscribers! I want an Azure Function, written in Dotnet 5.0 that has a Service Bus Topic trigger, and all the processing on that Azure Function will be logged to a Datalust / SEQ server that I have created in a web app ( read about it on this link )

Let’s learn a little more about this “Azure Functions in .NET 5.0”. So on .NET5.0 you can develop azure functions that run out-of-process, and doing so, lets you decouple your function code from Azure Functions Runtime.
I truly recommend the reading of https://docs.microsoft.com/en-us/azure/azure-functions/dotnet-isolated-process-guide so you can understand what is this.
In a very summarized way, A .NET isolated function project is basically a .NET console app project that targets .NET 5.0. The following are the basic files required in any .NET isolated project: host.json file, local.settings.json file, C# project file (.csproj) that defines the project and dependencies and Program.cs file that’s the entry point for the app
1. Creating the Azure Function
- 1 Required tools to make magic happen:
So we will need to have installed the following pieces of software/packages:
a) .NET 5.0 ( you can download and install it from this link )
b) (optional) Powershell ( you can download and install it from this link )
c) Azure Function Core Tools ( you can download and install it from this link, and pleaseeee select a version higher than 3.0.3388 )
d) Azure CLI ( you can download and install it from this link )
After you have all set up, and here I´ll assume that you have installed PowerShell, and after creating a new folder for your project, navigate to it in PowerShell and use the following command:
func new
It will then ask what kind of runtime you want in your new Azure Function, please select Dotnet (Isolated Process)

Then it will “ask” what is the trigger for your Azure Function. My use case asks for ServiceBusTopicTrigger, but choose the one that suits you best
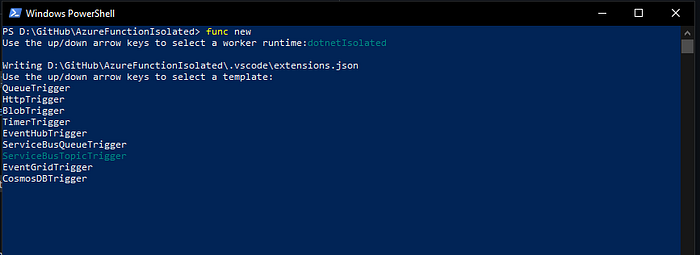
The last step is to give it a name, my case: “MediumTest” just for the fun =)
Note: Unfortunately, at the time I´m writing this, Visual Studio has still no support to create this “kind” of Azure Functions in an automated way… Sorry =/

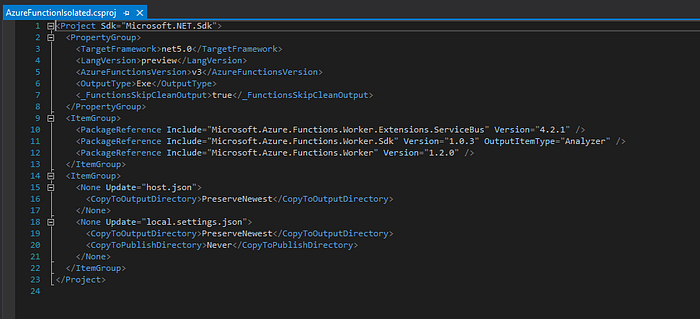
If you check your folder, you´ll have now a .csproj file with the same name of the folder you are in, and a .cs file with the name of the Azure Function that you have inserted before.

So, it´s time to check how are the files, open the csproj that will open up Visual Studio if you have it installed!
Right after opening in Visual Studio, my first thing is to update the nugget packages, and you will notice that the names of the nugget packages installed are slightly different from the ones you might be used to see in an Azure Function, so let's check, they have a “.worker.” part… So we are really coding workers!! NICE!!!!
1.2 Extra part for Service Bus Topic Trigger
If you also select for a Service Bus trigger, we now have to configure a little bit more, so we have to go to the file of the function (in my case MediumTest.cs) and edit the Azure Function so we can set up: the topic name, the subscription name and the name of the setting that will hold the connection string to the service bus.
My parameters for this example are:
Topic Name = “clients-topics”; Subscription Name = “default”; Connection String property name = ”ClientsSBConnection”

And we have to add the connection string. For this purpose, we will add it to the local.settings.json but when you go production, use another way of pushing the connection string… I am thinking of using the Key Vault to retrieve the connection string…

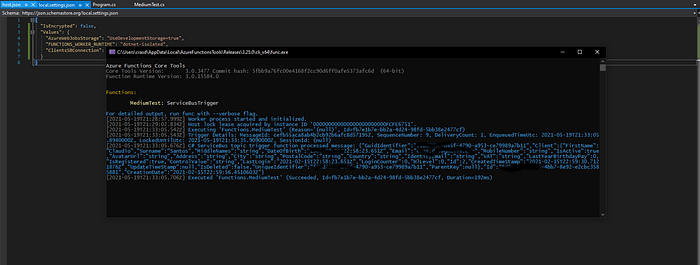
So we are ready to see if this works…
If you have Visual Studio as your IDE, just start a debugging session ( if by any case it fails, it didn´t fail in my case, but there are records that it can fail the debugging if you do your usual F5 in Visual Studio, please check this guide that might help you
So, after putting the Azure Function running, I sent a message to the Topic in the service bus and voilá :
More Functions! More triggers!!! GIVE ME!!!!
If you want to add new functions, you can just go back into the PowerShell and type func new and you can have some help on how to manage the signature and decorators of your function in this link.
1.3 Dependency Injection in Isolated Process Azure Function
Inspecting the Program.cs ( yeah I know we´re all used to have Startup.cs, and you can do it, but out of the box, it´s here you´ll DI ) and we can see that we have a HostBuilder with a couple of extension methods, one of them called ConfigureFunctionsWorkerDefaults() that as its name says, it's crucial for the correct behavior of the Azure Function, but we can also add some DI here, and even manage properly some middleware!

And we can also add services to be injected, as usual, using the ConfigureServices(), but for that, we need to add Microsoft.Azure.Functions.Extensions Package (V. 1.1.0 or higher )

2 Adding Serilog and connect it to the SEQ server.
Ahhh so now this one is easy! Let’s first add the packages we need:
<PackageReference Include=”Serilog” Version=”2.10.0" />
<PackageReference Include=”Serilog.Extensions.Logging” Version=”3.0.1" />
<PackageReference Include=”Serilog.Sinks.Console” Version=”3.1.1" />
<PackageReference Include=”Serilog.Sinks.Seq” Version=”5.0.1" />
Again these versions are the ones I use at the time of this writing, if you have an update, go for it!!
After installing the packages, we will use the Dependency Injection capabilities to configure our Serilog to our solution. Also, note that the last package that I´ve installed is Serilog.Sinks.Seq, it´s one who makes the magic to send the data to a remote SEQ server =)
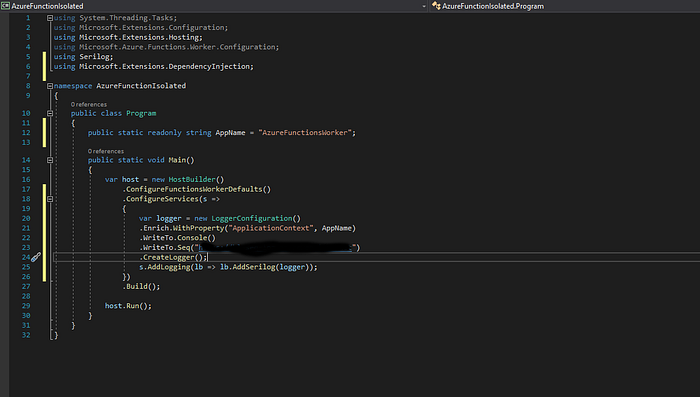
So inside the ConfigureServices we´ll add the following:
var logger = new LoggerConfiguration()
.Enrich.WithProperty(“ApplicationContext”, “MY SUPER FUNCTION”)
.WriteTo.Console()
.WriteTo.Seq(serverUrl)
.CreateLogger();
s.AddLogging(lb => lb.AddSerilog(logger));
I just added the write to console also, because I like the console =)
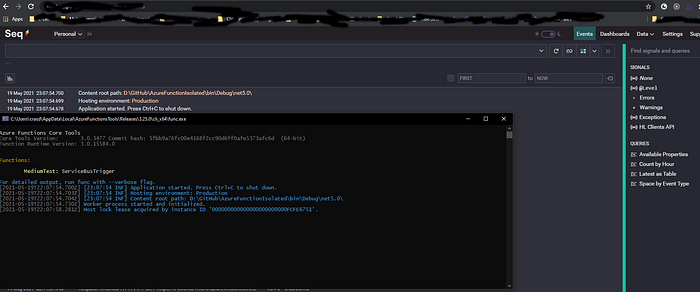
So let's power-up, and check it, and It works… I even sent a message and the logging system caught it and shipped it to the SEQ server! Everything working as expected ufff!!!
Waitt a minute!! we still have to deploy it to Azure!
3 Deploy to Azure
So now it's time to use Azure CLI!
First, we open a PowerShell and login to Azure, for that just type:
az loginIt will open a browser, please log in to that browser, and after it, return to the PowerShell and it will show your subscriptions. If you have more than one subscription, you might need to set a subscription where you will deploy the azure function, with the command. Ignore this step if you only have one subscription.
az account set --subscription "<ID OF SELECTED SUB>"If you don´t have a resource group ready or you might want to create a new one, you can use this command
az group create --name AzureFunctionsQuickstart-rg --location westeuropeWhere, of course, you change the name of the resource and location for whatever you desire!
All azure functions have to have a storage account, so let´s create one, or you can skip also this step if you have already provisioned a storage account.
az storage account create --name <STORAGE_NAME> --location westeurope --resource-group AzureFunctionsQuickstart-rg --sku Standard_LRSAfter this, we have to create the azure function in Azure to be ready to receive our files, so use this
az functionapp create --resource-group AzureFunctionsQuickstart-rg --consumption-plan-location westeurope --runtime dotnet-isolated --functions-version 3 --name <AZURE FUNCTION NAME> --storage-account <STORAGE ACCOUNT NAME>After this, if you check the resource group in Azure you should have all resources ready to receive your code

So its time to send files up to Azure, so make sure that your PowerShell is now in the same folder that your new Azure Function csproj file, and type the following
func azure functionapp publish <Function App name>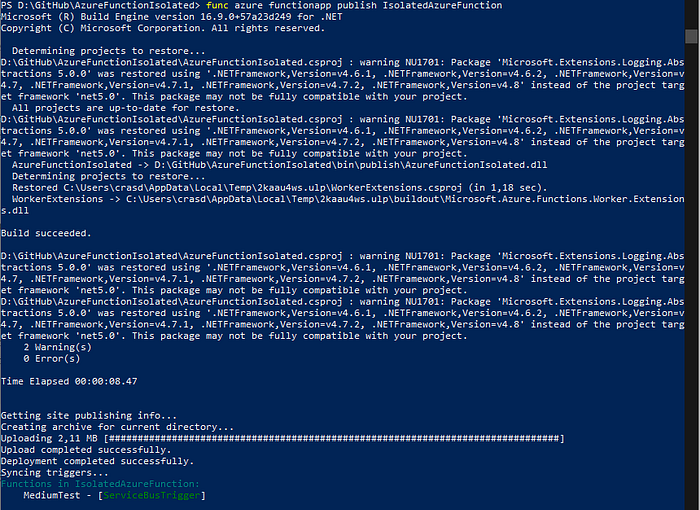
EXTRA NOTE
As you can see I´ve used CLI commands, and you can make use of Azure CLI and Powershell in Azure DevOps tasks… and doing so, you can automate all this!

Hope you enjoyed it! Don´t forget that you still have to make a better solution for the connection strings that are in the local.hosts.json and those don't go to Azure! I might write something on … How to use an Azure KeyVault to store secrets and extract them, like… A connection string!
Links Library :